We’re kicking off a new series focused on quickly setting up HighLevel, powered by HighLevel. In this post, I’ll walk you through one of the most crucial steps: setting up your domain for email. This ensures that your emails are delivered securely and don’t end up in spam or promotions folders. Let’s dive in and walk through it step-by-step.
Step 1: Access Email Services Settings
To start, go to Settings in your HighLevel subaccount and click on Email Services. When you first enter this section, you’ll see a notification about enhancing your email deliverability. This notification highlights key points like:
- Improving email deliverability
- Establishing brand credibility
- Increasing control over email security to prevent spoofing
- Reducing the likelihood of being marked as spam
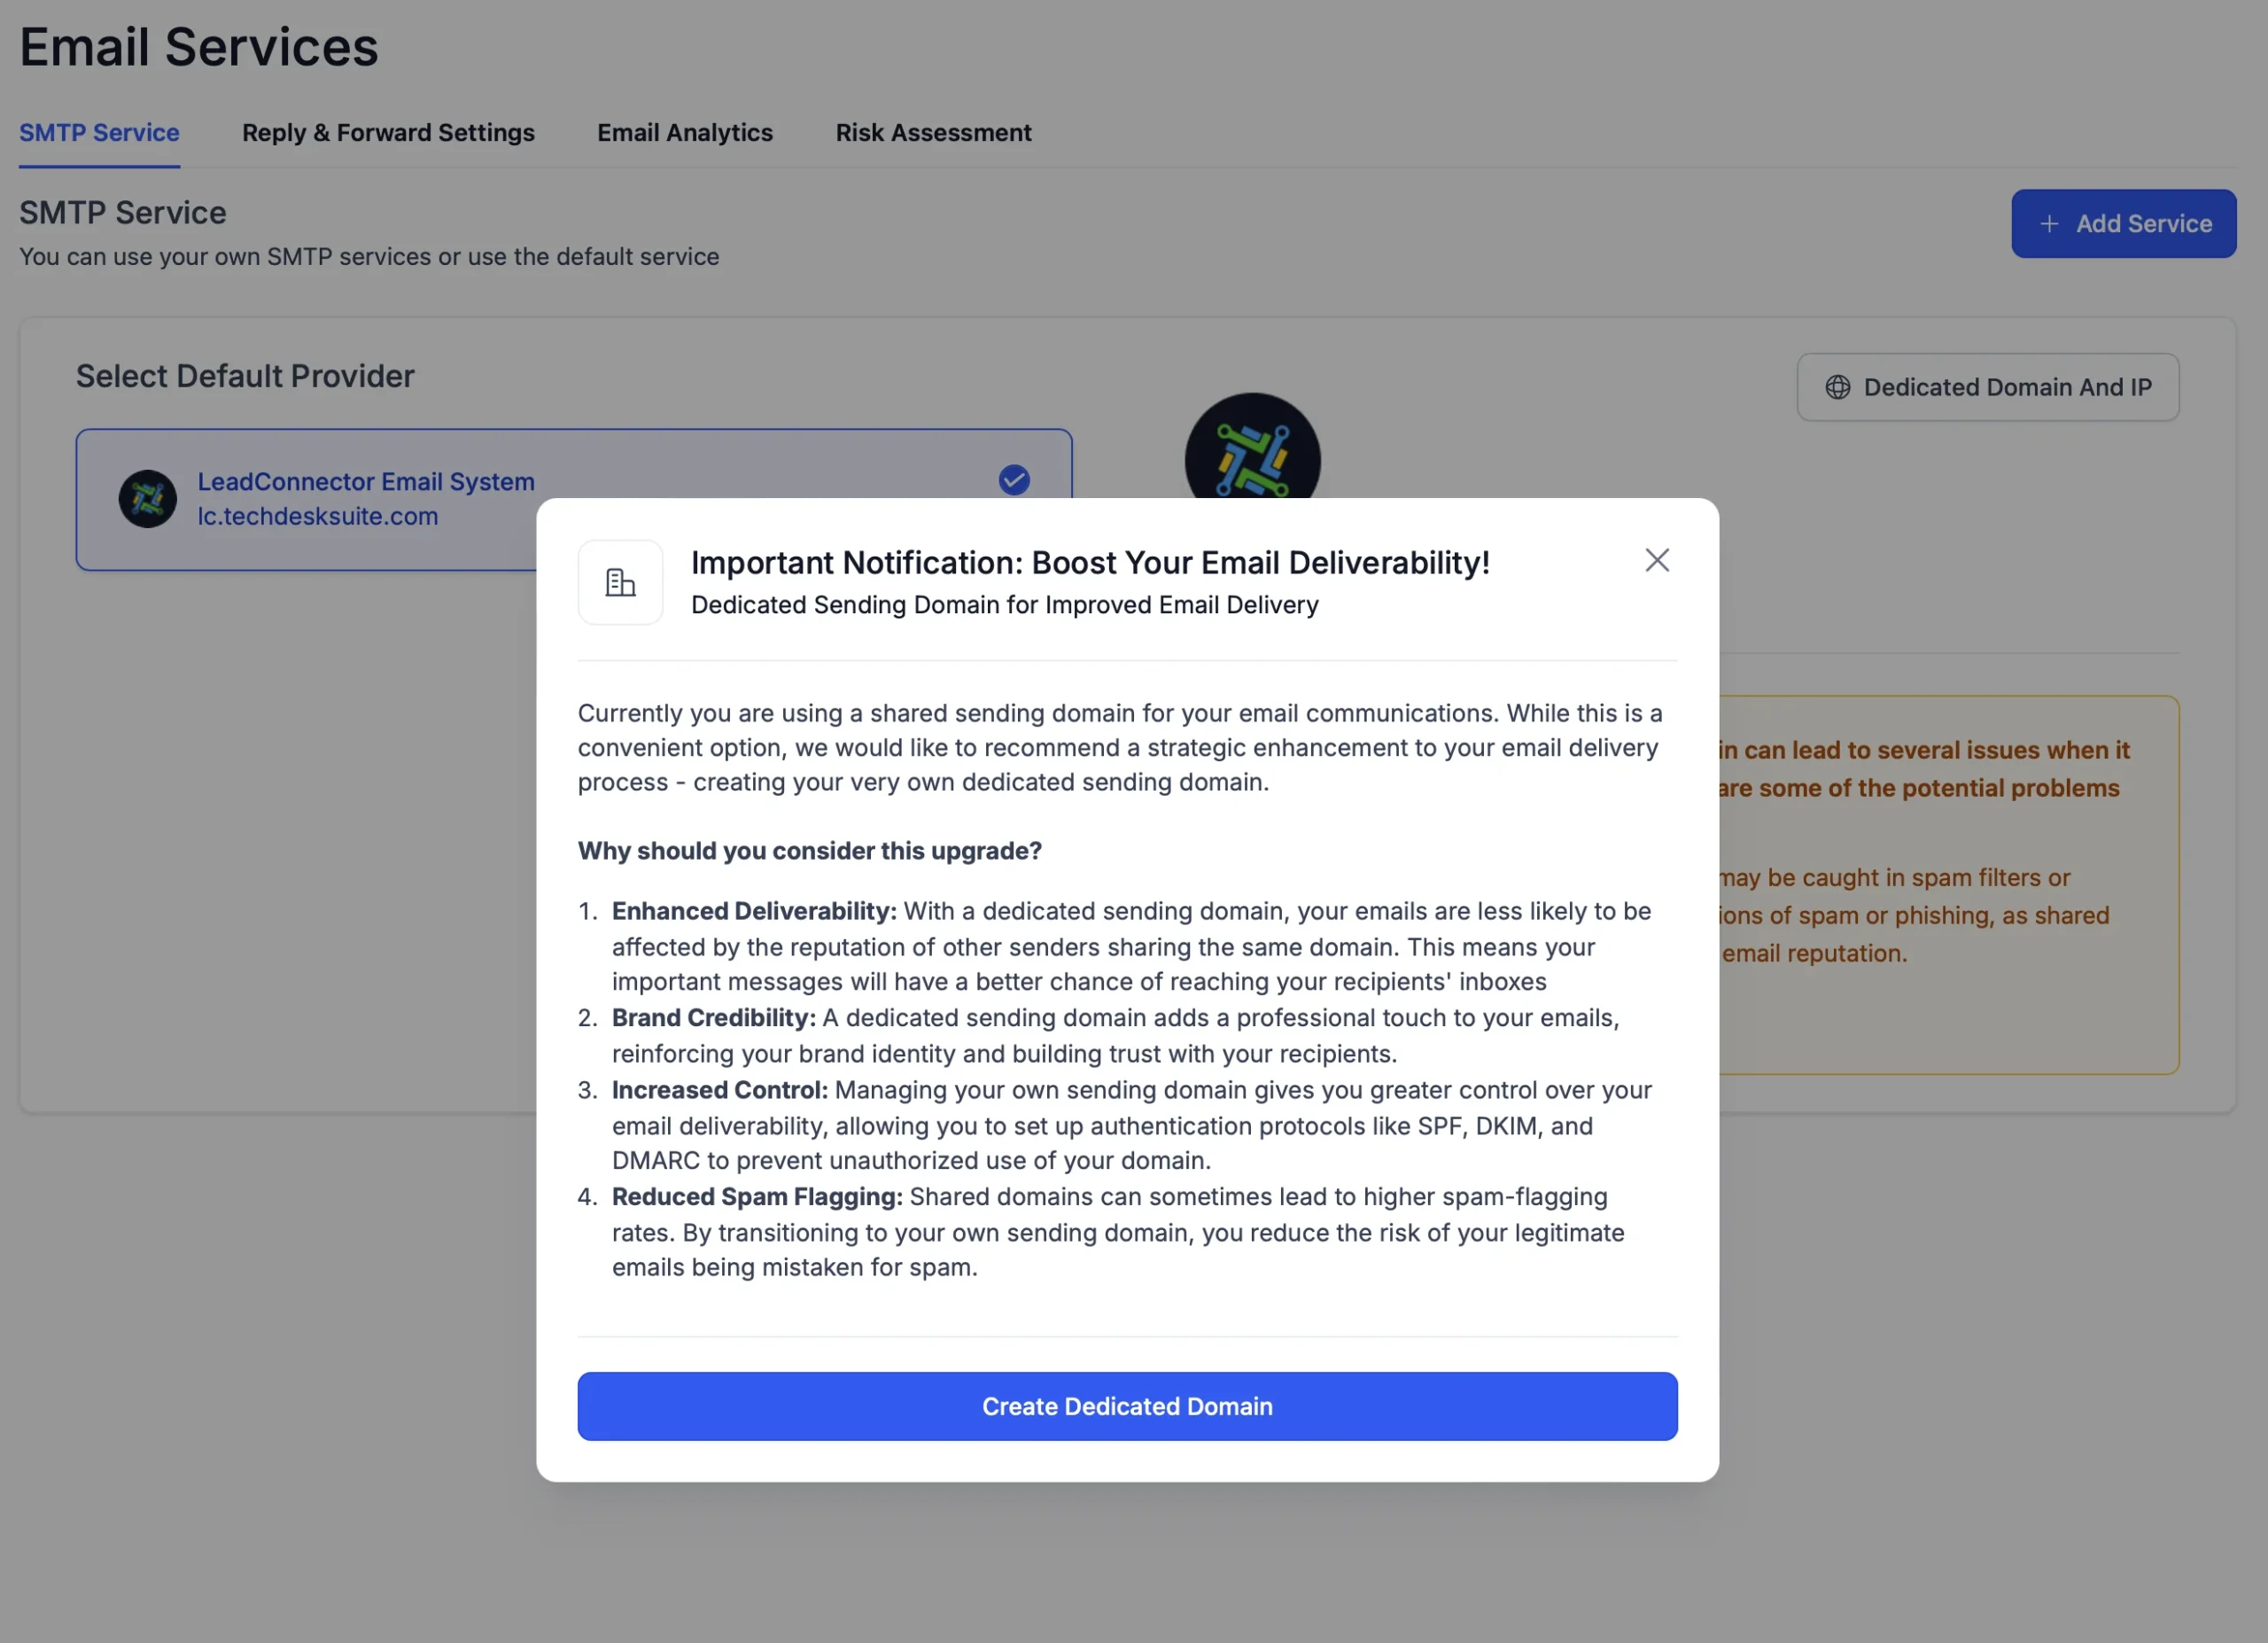
Setting up a dedicated domain is the first step in ensuring that your emails reach your recipients’ inboxes reliably.
Step 2: Create a Dedicated Domain
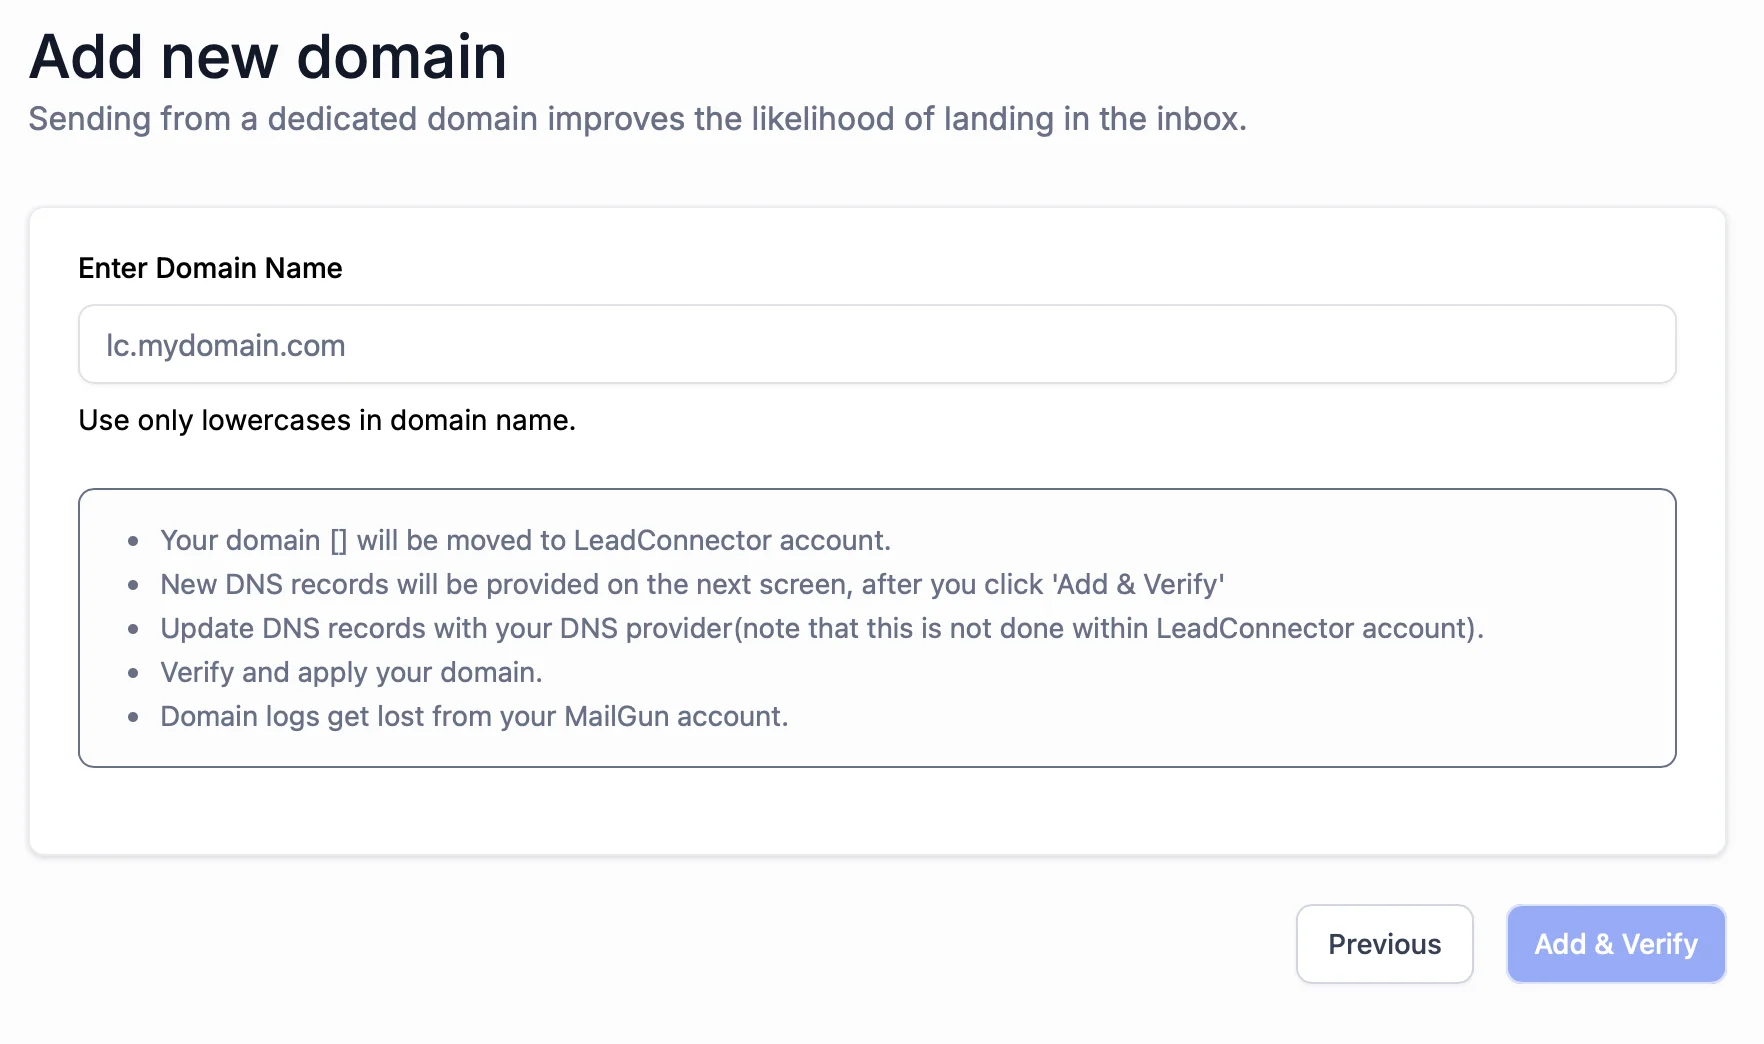
Click on Create Dedicated Domain. You’ll be prompted to add a new domain. Enter the domain you want to use for sending emails in HighLevel.
The trick here is to set up a subdomain specifically for sending emails, such as email.yourdomain.com. Don’t worry, your email addressing for sending email will still look like [email protected] After you input the subdomain, click Add and Verify.
Step 3: Verify Your Domain (Using Cloudflare)
The next step involves verifying your domain. This process can vary depending on where your domain is registered. I like to use Cloudflare, which makes connecting your domain incredibly easy.
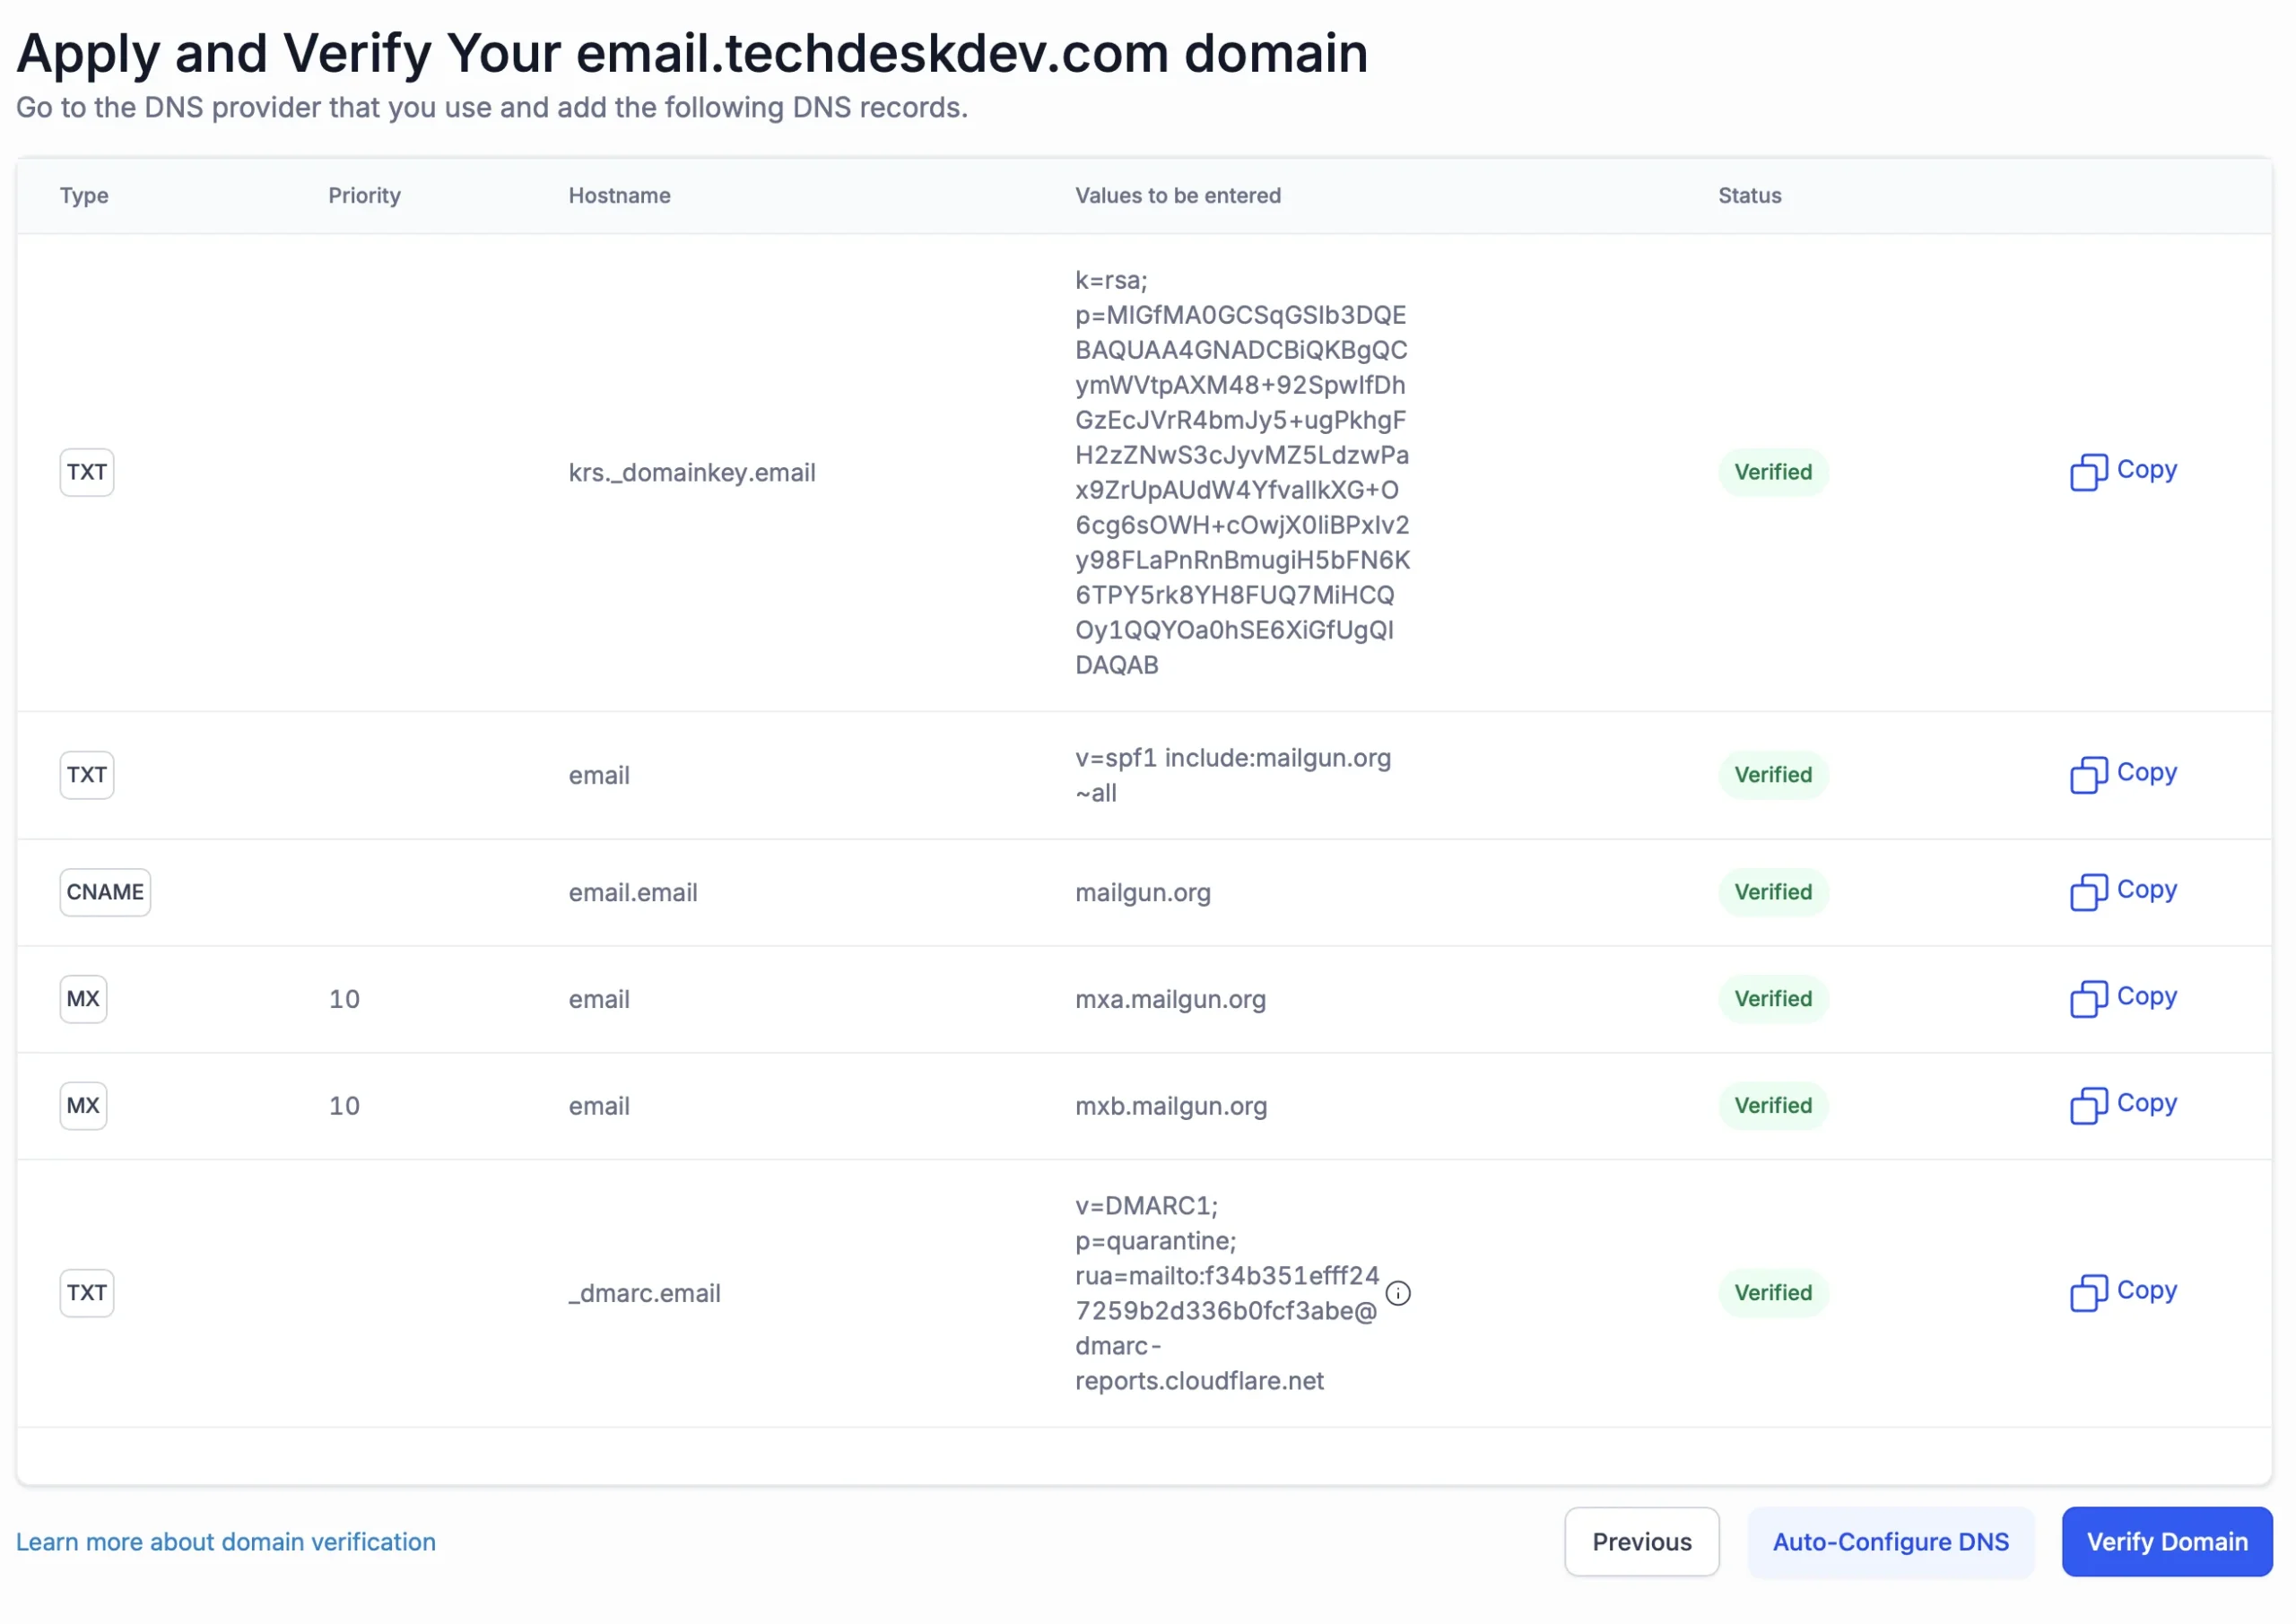
Click Continue after adding your domain, and you’ll be taken to a screen that automatically detects your DNS records. If you’re using Cloudflare, it will add the necessary DNS records, like TXT records and mail exchange (MX) records, on your behalf. Just follow the prompts on the screen.
If you are not using a domain that will auto-populate the DNS settings for you, you will need to manually copy & paste them into your DNS record.
Step 4: Finalize Domain Verification
After authorizing the domain, you might see a message indicating that your domain is not yet verified. This verification usually takes about 30 seconds, but if it doesn’t verify right away, you can back out of the dedicated domain screen and then retry the verification process.
Once verified, you’ll notice that all records except one may show as verified. The last record might say “not verified,” and while it’s optional, it’s crucial if you’re sending emails to popular providers like Yahoo or Gmail. We’ll cover that in the next step. Once verified, it should look like the screenshot below (except for the final record).
Step 5: Configure DMARC for Enhanced Security
The optional step involves configuring DMARC (Domain-based Message Authentication, Reporting & Conformance) settings. Again, this step is crucial if you are sending to Gmail & Yahoo email accounts. By default, the provided DMARC record from HighLevel might use “P=none,” which offers little to no security. Instead, change the setting to P=quarantine to send any suspicious emails to the spam folder while allowing legitimate emails to go through. Ideally, this should be set to P=reject; but, if not set up correctly, it can cause none of your emails to get delivered. So we’ll stick with quarantine.
You can easily configure DMARC using Cloudflare by copying the provided host name and setting the appropriate values. After making these changes, go back to HighLevel and verify your domain again. All the records should be green, like in the above screenshot.
Step 6: Set Up Your Default Email Header
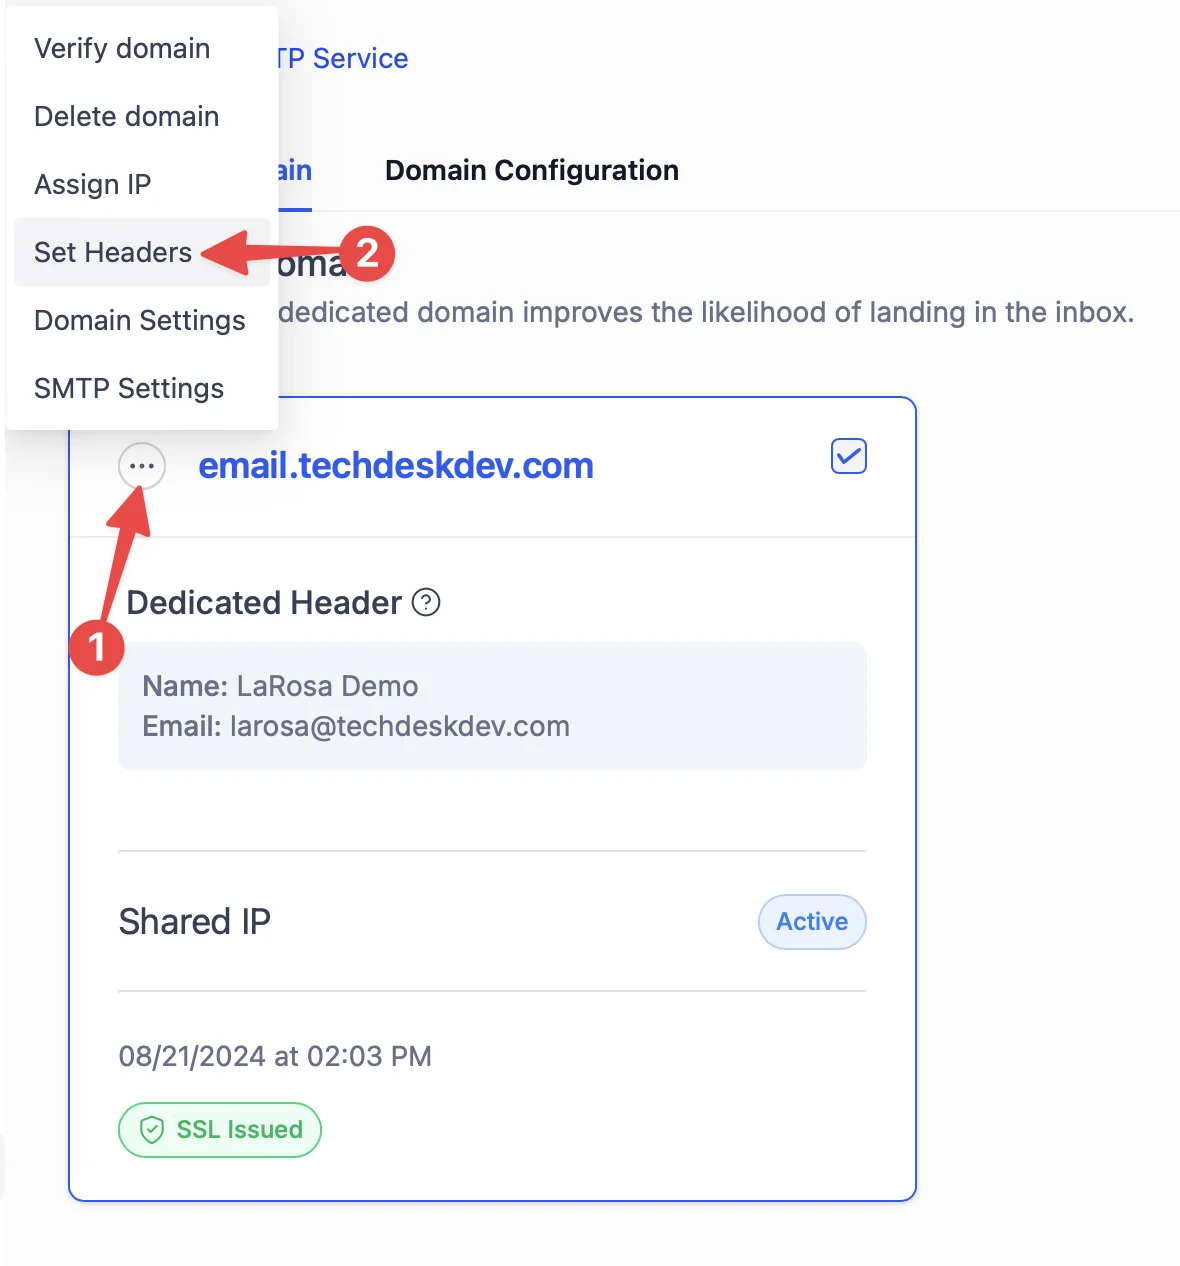
Once your domain is fully verified, it’s time to set up your email header. This ensures that your emails have a consistent sender name and email address. Click on the three dots next to your domain, select Set Headers, and input your From Name (e.g., Your Name) and Email (e.g., [email protected]).
Step 7: Configure Reply and Forward Settings
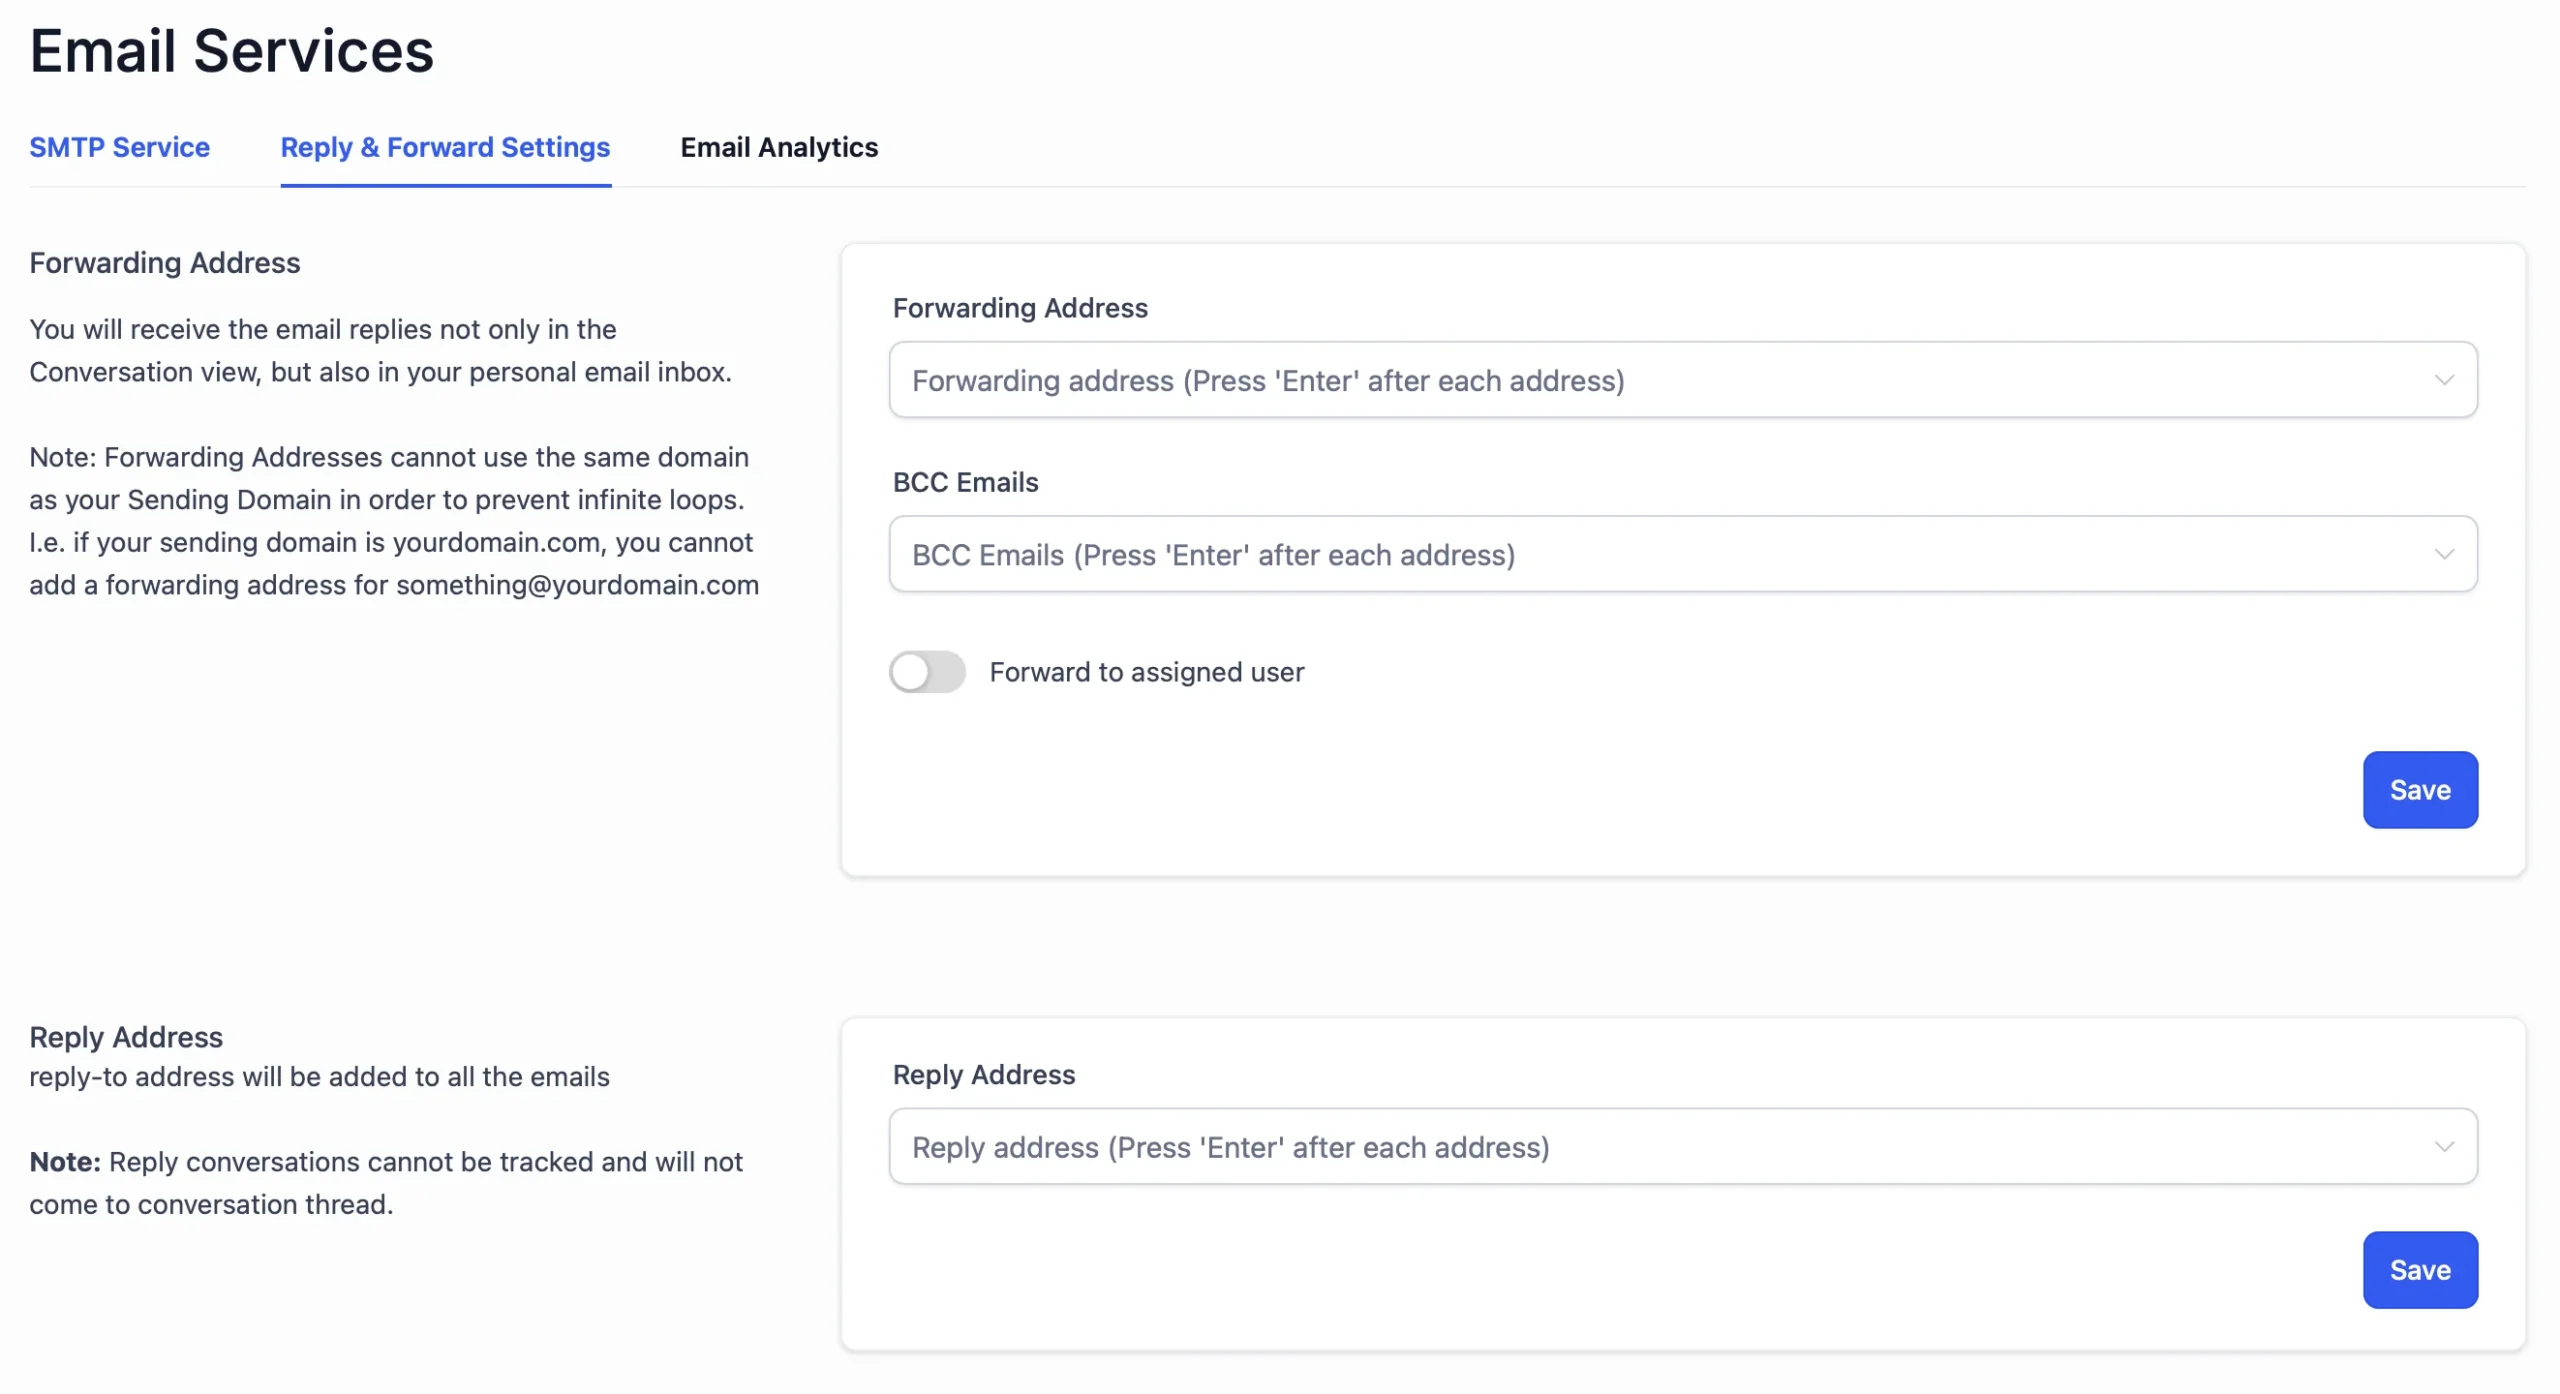
Finally, you’ll want to configure your Reply and Forward Settings. By default, replies to your emails will appear in the Conversations tab within HighLevel. If you prefer to have replies sent to your regular inbox, simply input your preferred email address in the reply field. Note: setting an email address in the reply address field will no longer deliver messages to the conversations tab in HighLevel.
Alternatively, you can set a forwarding address if you want replies to appear both in your inbox and the Conversations tab. Make sure to use an alias for the forwarding address to avoid any issues. Note: this cannot be the same email address you use to send the emails, otherwise things will get caught in an endless loop.
Wrapping Up
And that’s it! You’ve successfully set up your domain for sending emails with HighLevel. Now you’re ready to send email campaigns, newsletters, and regular emails to your clients with confidence. Stay tuned for the next post, where we’ll dive into more settings to help you get the most out of your HighLevel account.
Thanks for reading, and I’ll see you in the next guide!
Jump Start Your Automation Journey
Find out where automation can save you time and energy with our free Automation Checklist!
